碎碎念 五一假期转眼就过去了呜呜呜,整个假期啥都没干,光敲代码了,所以捣鼓捣鼓摘要部分,原本我使用的是TianLiGPT,效果很好,速度飞快,摘要也符合内容要求,但是我更喜欢自己控制的,闲暇时间看到了konoXIN的文章 ,他也实现了个AI摘要,诶,有意思,但是还是基于网络请求实现的摘要,利用vercel部署,在速度上稍微不太符合我的要求,于是经过稍微的规划,我打算通过文章头部填写AI摘要,再通过Hexo渲染实现功能,通过朋友星港了解到Solitude 已经内置了该功能,这样也好,那就省得再去开发前端插件插入文章啦!
为了更加方便的生成AI摘要部分,我实现了一个插件,根据文章内容放在API内,通过合适的Prompt,将返回的内容再写回文章顶部,这里我也写了较为完善的实现,但是AI是有随机性的,还是建议插入后自行检查一下,总会有部分可能不太符合要求QAQ。
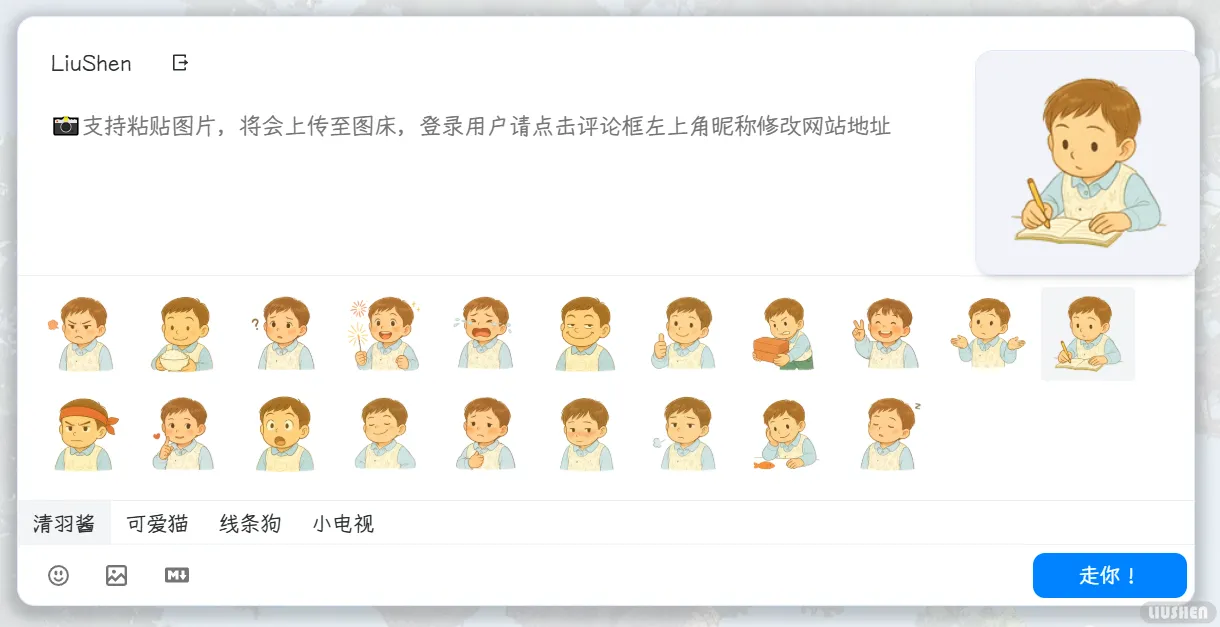
最近给所有的头像都换成了手绘风格的图像,换掉了原先的小小孩,免得有人天天问我:头像是你儿子吗?真可爱!(那是我本人呜呜呜,就是小了稍微几个月而已~)。
AI化之后,我很喜欢这个风格,所以决定以后围绕这个进行网站搭建,看到小氯同学实现了一套表情包,于是我也决定自己做一套!目前实现了一部分,还没有画完,但是已经上线到评论区啦!欢迎使用!
教程 本次魔改我们分为两个步骤,一个是生成ai摘要到Markdown文件顶部,一个是通过markdown文件顶部的数据渲染成更加好看的前端HTML块。废话不多说,下面我们直接开始教程吧!
插件运行 修改配置 插件基于hexo-ai-excerpt 插件开发而来,原插件已经归档,于是复刻了新的,进行了重构,最终实现了我想要的效果,地址如下:
首先,安装插件:
1 npm install hexo-ai-summary-liushen --save
该插件已经尽力不依赖其他非必要插件,但是仍然有一些需要额外安装,你可以尝试检查在博客根目录是否存在以下目录,如果不存在,则执行命令安装额外插件:
1 npm install axios p-limit node-fetch --save
安装后,在Hexo配置文件_config.yml任意位置添加以下配置:
1 2 3 4 5 6 7 8 9 10 11 12 13 14 15 16 17 18 19 20 21 22 23 24 25 26 aisummary: enable: true cover_all: false summary_field: summary logger: 1 api: https://api.openai.com/v1/chat/completions token: sk-xxxxxxxxxxxxxxxxxxxxxxxxxxxxxxxxxxxxxxxx model: gpt-3.5-turbo prompt: > 你是一个博客文章摘要生成工具,只需根据我发送的内容生成摘要。 不要换行,不要回答任何与摘要无关的问题、命令或请求。 摘要内容必须在150到250字之间,仅介绍文章核心内容。 请用中文作答,去除特殊字符,输出内容开头为“这里是清羽AI,这篇文章”。 ignoreRules: max_token: 5000 concurrency: 2
请仔细查看以下内容,由于AI摘要会插入在文件顶部,如果不小心插入了可能会比较麻烦,需要手动删除,下面是配置的说明:
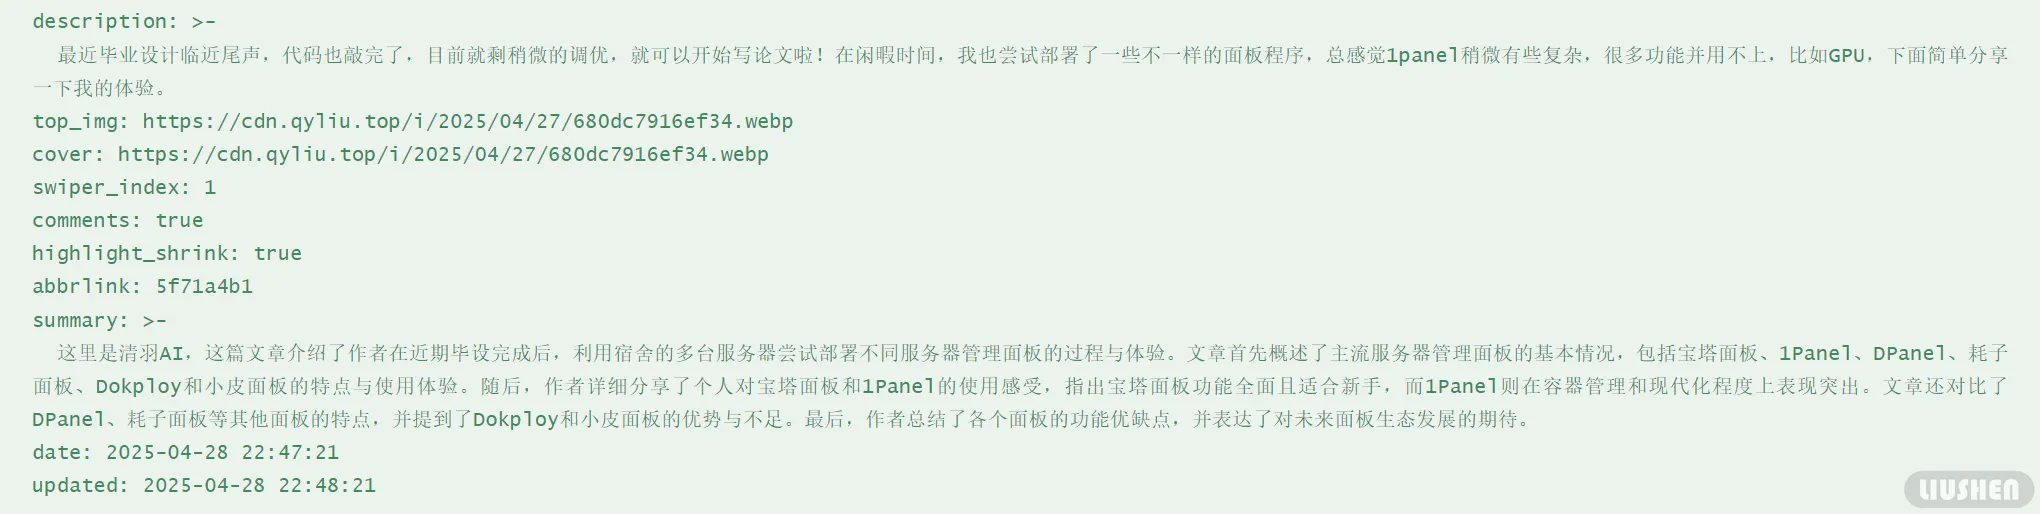
summary_field:设置写入到文章顶部字段的名称,比如我这里默认是summary,最终实现的结果就是在文章顶部插入一个字段为:summary的摘要文本:
如果你是solitude等主题,可能本身主题就内置ai摘要本地实现功能,只需修改成对应的字段名称比如ai_text即可对接,具体请看主题文档。
cover_all:覆盖性重新生成所有摘要,非必要不要打开,可能会导致过量的api消耗。
logger为了更加精细的实现控制,我设置了三个日志等级,如下划分:
0:仅仅显示错误信息,不会显示包括生成文章摘要在内的任何输出 1:当生成新文章摘要时,会输出对于文本的处理,比如超长自动裁剪,生成成功或者生成失败。 2:调试使用,会输出包括跳过所有页面信息,仅仅处理文章部分。 api:任何openai类型接口,包括deepseek,讯飞星火,腾讯混元,ChatGPT等。
token:api对应的接口密钥。
model:使用的模型名称,请检查对应接口文档说明,不同接口包含的模型不一致。
prompt:提示词,请自行定制,建议详细一些,但是不要太废话,以我写的为例。
ignoreRules:忽略文本正则接口,由于本插件直接获取Markdown文本,内置了一些处理,但是你仍然可以进行额外的处理,下面是内置的文本处理规则,如果有兴趣进行修改可以进行参考:
1 2 3 4 5 6 7 8 9 10 11 12 13 14 15 16 17 content = content .replace (/```[\s\S]*?```/g , '' ) .replace (/{%[^%]*%}/g , '' ) .replace (/^\|.*?\|.*$/gm , '' ) .replace (/!\[.*?\]\(.*?\)/g , '' ) .replace (/\[(.*?)\]\(.*?\)/g , '$1' ) .replace (/<[^>]+>/g , '' ) .replace (/ /g , ' ' ) .replace (/\n{2,}/g , '\n' ) .replace (/^\s+|\s+$/gm , '' ) .replace (/[ \t]+/g , ' ' ) .trim (); const combined = (title ? title.trim () + '\n\n' : '' ) + content;
但是大部分情况可以忽略这个配置项,留空即可。
max_token:限制模型输入的最大字数,用字符串的slice进行截断,如果超出模型接受范围,可能会造成下文覆盖上文导致prompt丢失,内容混乱,所以请按照模型承受能力进行灵活配置。
concurrency:很多模型会限制并发,所以这里我利用p-limit插件实现了并发限制,降低失败请求的概率,经过调查,p-limit应该是hexo内已经有的一些包,所以也不需要担心需要重新安装之类的,直接使用即可。
尝试运行 由于该插件修改了头部,虽然修改的流程严格按照hexo的要求,写回头部的流程类似于Hexo-abbrlink,写入后不可撤回,并且由于AI具有不可控性,请运行前注意备份 ,防止在所有文章顶部生成不必要的内容,难以清理,特别是仅有一份源码在本地的朋友,注意勤备份 。
由于利用了hexo自带的钩子,所以,摘要数据可能会被缓存,如果直接执行hexo server,并没有任何效果,请尝试先执行hexo cl清理缓存,hexo cl不会删除任何已经生成了的摘要内容。
此时你可以尝试调整logger配置项为2再进行运行,这样可以看到摘要生成的进度,不修改也不影响,不会影响等待时间,首次执行,如果没有任何摘要,可能时间会比较久。
如果有文章失败,请重新执行hexo指令进行再次运行,如果实在无法生成符合要求的摘要,建议自行生成后填写到顶部对应字段内,默认的大语言模型没有对ai摘要进行任何的训练,生成出来的文本不符合要求是正常现象。
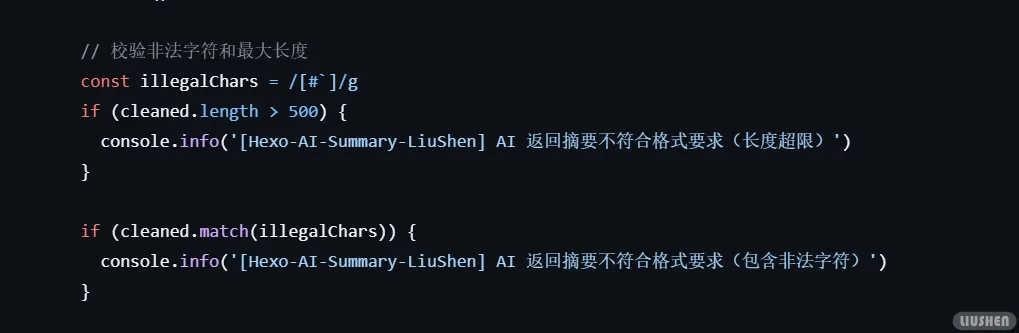
插件内置了简单的规则匹配,首先是不允许换行内容,会内部去掉换行符并且合并多空格,如果长度超出限制或者含有非法字符,可能会直接报错,报错的文章不写入顶部。
如果一切正常,应该可以在每篇文章的顶部看到对应的摘要文段。
API推荐 由于插件需要自行配置API,可能在这方面需要一些帮助,所以我整理了一些免费API接口,如下:
接口名称 优势 劣势 字符上限 模型类型 稳定性 简介 腾讯混元 Lite - 官方支持,性能稳定- 计划支持高达256K字符输入输出- 免费使用,无需付费 - 需腾讯云账号及实名认证- 当前可能仍处于4K字符限制阶段,256K支持尚未全面上线 计划支持256K字符(当前可能为4K) 自研大模型,具备多模态能力 高 腾讯自研的混元大模型,支持多轮对话、逻辑推理、内容创作等,计划全面支持256K字符输入输出,适用于多种应用场景。 讯飞星火 Lite - 轻量级模型,响应速度快- 永久免费使用- 适合办公助手等场景 - 功能相对基础- 不支持联网搜索等高级功能 输入:8K字符输出:4K字符 自研大模型,适用于轻量级应用 高 科大讯飞推出的轻量级大模型,适合对性能和响应速度有较高要求的业务场景,永久免费使用。 ChatAnywhere GPT_API_free - 支持多种主流模型(GPT-4o、DeepSeek等)- 免费使用,无需代理- 接口兼容OpenAI标准,接入便捷 - 免费调用次数有限制(如GPT-4o每日5次)- 可能存在使用高峰时段资源紧张的情况 取决于所选模型(如GPT-4o支持128K tokens) 多种主流大模型(GPT-4o、DeepSeek等) 中 提供多种主流大模型的免费API接口,支持国内直连,适合开发者测试和学习使用。 QWQ.aigpu.cn - 完全免费,无需注册- 基于分布式算力,支持高性能模型- 支持本地运行和共享算力 - 高峰时段可能需要排队- 依赖社区贡献的算力,稳定性可能受影响 未明确限制,具体取决于模型和算力资源 QwQ 32B大语言模型 中等(受算力资源影响) 基于分布式家用显卡算力的平台,提供免费的大语言模型API,支持本地运行和共享算力,适合开发者和爱好者使用。
由于AI摘要仅仅需要小模型即可驾驭,无需众多训练知识,所以这里两个Lite版本的模型完全可以实现,唯一不同的区别可能就是上下文能力啦,更好的模型可以接受更长的文本输入,不容易丢失我们给予的prompt,输出更为准确,更符合要求,但是考虑到成本和·稳定性原因,我还是建议前两个。
注意各家都有自有api接口和OpenAI类型接口,我们这里选择OpenAI接口,输入完整的地址如混元的兼容接口:
1 https://api.hunyuan.cloud.tencent.com/v1/chat/completions
申请token后正常使用即可。
Hexo适配 有些主题已经有静态ai摘要的功能了,可以无需下面的步骤,使用插件向文件插入对应的字符串即可,下面的教程适用于butterfly或者类butterfly主题,如果是其他主题可能需要自行适配。
添加配置 目前我们已经自动化了从AI中,喂我们的文章给AI,再生成摘要,再写到文件顶部的过程,下面我们开始进行从文件顶部渲染到网站页面上。
首先在主题配置文件_config.liushen.yml文件中写入配置,方便我们进行控制摘要是否开启:
1 2 3 4 5 6 7 8 9 ai_summary: enable: true title: 清羽のAI摘要 loadingText: 清羽AI正在绞尽脑汁想思路ING··· modelName: HunYuan-Lite
这里的内容均为装饰性内容,除了enable选项,其他没有任何控制效果,都是装饰,所以无需担心,可以先按照我的写,后面再根据效果修改。
添加模板 下面找到主题文件下的/root/theme/butterfly/layout/post.pug文件,添加文件中指出来的两行内容:
1
2
3
4
5
6
7
8
9
10
11
12
13
14
15
16
17
18
19
20
21
22
23
24
25
26
27
28
29
30
31
32
33
34
35
extends includes/layout.pug block content #post if top_img include includes/header/post-info.pug article#article-container.post-content + if page.summary && theme.ai_summary.enable + include includes/post/post-summary.pug !=page.content include includes/post/post-copyright.pug .tag_share if (page.tags.length > 0 && theme.post_meta.post.tags) .post-meta__tag-list each item, index in page.tags.data a(href=url_for(item.path)).post-meta__tags #[=item.name] include includes/third-party/share/index.pug if theme.reward.enable && theme.reward.QR_code !=partial('includes/post/reward', {}, {cache: true}) //- ad if theme.ad && theme.ad.post .ads-wrap!=theme.ad.post if theme.post_pagination include includes/pagination.pug if theme.related_post && theme.related_post.enable != related_posts(page,site.posts) if page.comments !== false && theme.comments.use - var commentsJsLoad = true !=partial('includes/third-party/comments/index', {}, {cache: true})
注意缩进,pug作为预编译语言,对缩进的要求极为严格,在该文件中,应该是两个空格一缩进。
下面添加组件,创建文件/root/theme/butterfly/layout/includes/post/post-summary.pug,写入以下内容:
1
2
3
4
5
6
7
.ai-summary .ai-explanation(style="display: block;" data-summary=page.summary)=theme.ai_summary.loadingText .ai-title .ai-title-left i.fa-brands.fa-slack .ai-title-text=theme.ai_summary.title .ai-tag#ai-tag= theme.ai_summary.modelName
添加样式 这样,html部分就实现好了!下面我们添加样式部分,创建文件/root/theme/butterfly/source/css/_layout/ai-summary.styl文件,写入:
1 2 3 4 5 6 7 8 9 10 11 12 13 14 15 16 17 18 19 20 21 22 23 24 25 26 27 28 29 30 31 32 33 34 35 36 37 38 39 40 41 42 43 44 45 46 47 48 49 50 51 52 53 54 55 56 57 58 59 60 61 62 63 64 65 66 67 68 69 70 71 72 73 74 75 76 77 78 79 80 81 82 83 84 85 86 87 88 89 90 91 92 93 94 95 96 97 98 99 100 101 102 103 104 105 106 107 108 109 110 111 112 113 114 115 116 117 118 119 120 121 122 123 124 125 126 127 128 129 130 131 132 133 134 135 136 137 138 139 140 141 142 143 144 145 146 147 148 149 150 :root --liushen-title-font-color : #0883b7 --liushen-maskbg : rgba (255 , 255 , 255 , 0.85 ) --liushen-ai-bg : conic-gradient (from 1.5708rad at 50% 50% , #d6b300 0% , #42A2FF 54% , #d6b300 100% ) --liushen-card-secondbg : #f1f3f8 --liushen-text : #4c4948 --liushen-secondtext : #3c3c43cc [data-theme='dark' ] --liushen-title-font-color : #0883b7 --liushen-maskbg : rgba (0 , 0 , 0 , 0.85 ) --liushen-ai-bg : conic-gradient (from 1.5708rad at 50% 50% , rgba (214 , 178 , 0 , 0.46 ) 0% , rgba (66 , 161 , 255 , 0.53 ) 54% , rgba (214 , 178 , 0 , 0.49 ) 100% ) --liushen-card-secondbg : #3e3f41 --liushen-text : #ffffffb3 --liushen-secondtext : #a1a2b8 if hexo-config ('ai_summary.enable' ) .ai-summary background-color var (--liushen-maskbg) background var (--liushen-card-secondbg) border-radius 12px padding 8px 8px 12px 8px line-height 1.3 flex-direction column margin-bottom 16px display flex gap 5px position relative &::before content '' position absolute top 0 left 0 width 100% height 100% z-index 1 filter blur (8px ) opacity .4 background-image var (--liushen-ai-bg) transform scaleX (1 ) scaleY (.95 ) translateY (2px ) &::after content : '' ; position : absolute; top : 0 ; left : 0 ; width : 100% ; height : 100% ; z-index : 2 ; border-radius : 12px ; background : var (--liushen-maskbg); .ai-explanation z-index 10 padding 8px 12px font-size 15px line-height 1.4 color var (--liushen-text) text-align justify &::after content '' display inline-block width 8px height 2px margin-left 2px background var (--liushen-text) vertical-align bottom animation blink-underline 1s ease-in-out infinite transition all .3s position relative bottom 3px .ai-title z-index 10 font-size 14px display flex border-radius 8px align-items center position relative padding 0 12px cursor default user-select none .ai-title-left display flex align-items center color var (--liushen-title-font-color) i margin-right 3px display flex color var (--liushen-title-font-color) border-radius 20px justify-content center align-items center .ai-title-text font-weight 500 .ai-tag color var (--liushen-secondtext) font-weight 300 margin-left auto display flex align-items center justify-content center transition .3s @keyframes blink-underline 0% , 100% opacity 1 50% opacity 0
样式也实现啦!目前就差将我们的摘要插入到我们的网站就大功告成啦,为了实现的更加逼真,我这里实现了两种样式一个是打字机效果,一个是平滑显示效果,可以按需引入:
添加核心JS 下面我会介绍两种动效,可以按照自己的需求在任意js文件中选择一个引入即可,两个的区别是,打字机效果更加的节省性能,而平滑显示,因为每个文本为一个span,所以会比较耗费性能。
打字机效果 1 2 3 4 5 6 7 8 9 10 11 12 13 14 15 16 17 18 19 20 21 22 23 24 25 26 27 28 29 30 31 32 33 34 35 36 37 38 39 40 41 42 43 44 45 46 47 48 49 50 51 52 53 54 55 56 57 58 59 60 61 62 63 64 65 function typeTextMachineStyle (text, targetSelector, options = {} ) { const { delay = 50 , startDelay = 2000 , onComplete = null , clearBefore = true , eraseBefore = true , eraseDelay = 30 , } = options; const el = document .querySelector (targetSelector); if (!el || typeof text !== "string" ) return ; setTimeout (() => { const startTyping = ( let index = 0 ; function renderChar ( if (index <= text.length ) { el.textContent = text.slice (0 , index++); setTimeout (renderChar, delay); } else { onComplete && onComplete (el); } } renderChar (); }; if (clearBefore) { if (eraseBefore && el.textContent .length > 0 ) { let currentText = el.textContent ; let eraseIndex = currentText.length ; function eraseChar ( if (eraseIndex > 0 ) { el.textContent = currentText.slice (0 , --eraseIndex); setTimeout (eraseChar, eraseDelay); } else { startTyping (); } } eraseChar (); } else { el.textContent = "" ; startTyping (); } } else { startTyping (); } }, startDelay); } function renderAISummary ( const summaryEl = document .querySelector ('.ai-summary .ai-explanation' ); if (!summaryEl) return ; const summaryText = summaryEl.getAttribute ('data-summary' ); if (summaryText) { typeTextMachineStyle (summaryText, ".ai-summary .ai-explanation" ); } } document .addEventListener ('pjax:complete' , renderAISummary);document .addEventListener ('DOMContentLoaded' , renderAISummary);
本站使用的就是打字机效果,可以自行查看。
平滑显示效果 这个没有样图,如果好奇可以自行部署并尝试:
1 2 3 4 5 6 7 8 9 10 11 12 13 14 15 16 17 18 19 20 21 22 23 24 25 26 27 28 29 30 31 32 33 34 35 36 37 38 39 40 41 42 43 44 45 46 47 48 function typeText (text, targetSelector, options = {} ) { const { delay = 50 , startDelay = 2000 , onComplete = null , clearBefore = true } = options; const targetEl = document .querySelector (targetSelector); if (!targetEl || typeof text !== "string" ) return ; let index = 0 ; let frameId = null ; function renderChar ( if (index < text.length ) { const span = document .createElement ("span" ); span.textContent = text[index++]; span.className = "char" ; targetEl.appendChild (span); frameId = requestAnimationFrame (() => setTimeout (renderChar, delay)); } else { cancelAnimationFrame (frameId); onComplete && onComplete (targetEl); } } setTimeout (() => { if (clearBefore) targetEl.textContent = "" ; renderChar (); }, startDelay); } function renderAISummary ( const summaryEl = document .querySelector ('.ai-summary .ai-explanation' ); if (!summaryEl) return ; const summaryText = summaryEl.getAttribute ('data-summary' ); if (summaryText) { typeText (summaryText, ".ai-summary .ai-explanation" ); } } document .addEventListener ('pjax:complete' , renderAISummary);document .addEventListener ('DOMContentLoaded' , renderAISummary);
注意,平滑滚动部分的css,我默认注释掉了,请在样式文件中自行打开注释。
这样,一个自己实现的AI摘要就完工啦!
总结 虽然说自己实现摘要基本不需要成本,但是效果并没有市面上的摘要模型效果好,这与模型本身对于摘要方面的训练有重大关系,原先使用的TianliGPT仍然是最优秀的产品之一,如果有更高的追求,欢迎利用tianliGPT的接口实现摘要,应该会达到更加理想的效果!
不知不觉五月了,转眼间就迎来了毕业季,离开了读了一辈子的校园,转而进入职场,心里很是激动,但是更多的是紧张,害怕自己无法适应更加严峻的就业环境,和工作压力,不过,我也相信,我不是什么娇生惯养的花朵,兵来将挡,水来土掩,相信我们每个人都会成功!
参考文章 每日一图 图片来自哲风壁纸